Sunday, November 30, 2008

Fearless Backbends


by Jason Crandell

Because we spend so much of our day hunched over a computer or moving forward, moving backward into a backbend is an unfamiliar feeling. And since our bodies and minds prefer to stick with the status quo, practicing backbends may trigger physical and psychological resistance. It's normal to feel frustrated, awkward, or even uncomfortable during your exploration of Cobra Pose and other backbends. Resistance is a natural part of breaking habits and moving into the unfamiliar, so be patient and compassionate with yourself. You aren't alone in your difficulty. With a little patience, curiosity, and practice, you'll learn how to navigate through your resistance. Here are a few suggestions for dealing with aversion and difficulty in backbends.

BEAR WITNESS Without immediately responding, observe the range of feelings that arise as you practice backbends. If there is a sharp, localized pain in your body, stop immediately. However, if you encounter mild physical or psych-ological resistance, be with it.Try witnessing your response to difficult feelings. Not only will you begin to see that resistance passes and transforms, you'll learn mindfulness, which is at the heart of the yoga practice.

SLOW DOWN Many of us go too far, too fast in our yoga practice. We prefer to accelerate through the learning, sensing, feeling process, and skip straight to the doing process. If you're having difficulty in a backbend, minimize the size of your backbend until it feels evenly distributed and healthy. Remember, you are searching for an even, graceful arc, not a visual spectacle. Besides, it's better to injure your ego than your body.

REPEAT REGULARLY The only way to learn a new pattern in the body and mind is to practice it consistently. Do backbends that feel appropriate to you as often as possible. Incorporate them into your yoga routine and daily life. You can do small backbends—like clasping your hands behind your back, lifting your chest, and simply stretching—sitting in your chair at work, waiting for the train, or standing in line at the grocer.

BE BRIEF It may be daunting to think about staying in a backbend for 30 seconds. But is it still scary if you hold it for, say, five seconds? Repeating your backbends more often and holding them for a very brief moment is an effective way to reduce your aversion.

BASK IN THE BEND Backbends are thought to be energizing, uplifting, and stimulating. After you finish a backbend, take a moment as you breathe to notice if your energy has changed. You may notice sensations immediately after a pose or later in the day—it will vary from day to day.

Jason Crandell would like to thank Nina Zolotow for her expertise and guidance. Contact him at www.jasonyoga.com.

Upward Bow (Wheel Pose)- Urdhva Dhanurasana


by Yoga Journal

Urdhva Dhanurasana

Step 1: Lie supine on the floor. Bend your knees and set your feet on the floor, heels as close to the sitting bones as possible. Bend your elbows and spread your palms on the floor beside your head, forearms relatively perpendicular to the floor, fingers pointing toward your shoulders.

Step 2: Pressing your inner feet actively into the floor, exhale and push your tailbone up toward the pubis, firming (but not hardening) the buttocks, and lift the buttocks off the floor. Keep your thighs and inner feet parallel. Take 2 or 3 breaths. Then firmly press the inner hands into the floor and your shoulder blades against the back and lift up onto the crown of your head. Keep your arms parallel. Take 2 or 3 breaths.

Step 3: Press your feet and hands into the floor, tailbone and shoulder blades against your back, and with an exhalation, lift your head off the floor and straighten your arms. Turn the upper thighs slightly inward and firm the outer thighs. Narrow the hip points and lengthen the tailbone toward the backs of the knees, lifting the pubis toward the navel.

Step 4: Turn the upper arms outward but keep the weight on the bases of the index fingers. Spread the shoulder blades across the back and let the head hang, or lift it slightly to look down at the floor.

Step 5: Stay in the pose anywhere from 5 to 10 seconds or more, breathing easily. Repeat anywhere from 3 to 10 times.

Monday, November 24, 2008

Get a Leg-Up on Varicose Veins

By Anna Soref

It's time to get dressed for yoga class, and you're faced with a wardrobe decision: Will it be the leotard, the shorts, or the leggings? If you're one of the 50 percent of people who suffer from varicose veins, the leggings will probably win out. But with a little help from the plant world, the bulging blood vessels could be a thing of the past, leaving your wardrobe options wide open.

Varicose veins are caused by damage to the valves which prevents vascular flow from moving in one direction, as it usually does. This in turn causes the blood to pool and the vein to swell. Aside from being unattractive, these swollen veins can cause extreme pain and lead to more severe problems.

To counteract this effect, Mindy Green, director of education for the Herb Research Foundation in Boulder, Colorado, recommends taking herbs that increase circulation, such as horse chestnut, gotu kola, and butcher's broom. Their ability to treat varicose veins has been confirmed in numerous studies conducted in Europe, where these herbs are widely used. A study published in the British medical journal The Lancet, for instance, found that 50mg of horse chestnut extract taken twice a day proved just as effective as using the expensive and cumbersome leg-stockings often recommended by doctors.

Green says to follow the manufacturer's dosage instructions for these herbs as their strength may vary, "especially with horse chestnut, which can be toxic when overtaken."
Green also suggests applying horse chestnut tincture directly to the skin daily as a preventative measure, and adds that compresses with astringent herbs such as white oak bark or witch hazel have a toning effect.

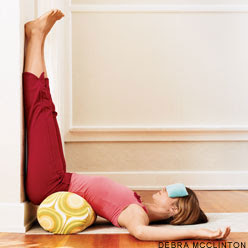
Many health practitioners recommend spending as much time as possible with the legs elevated to get the blood moving. Yoga postures such as Viparita Karani (pictured above), with the legs up against a wall, are ideal. Standing and sitting for too long (especially with legs crossed) can aggravate symptoms, so take frequent stretching and walking breaks when working at a desk.
Studies also demonstrate that a diet high in flavonoid-rich foods such as berries can help prevent the development of varicose veins and maintain vein wall integrity.

A tea made from buckwheat, high in the bioflavonoid rutin, has been shown to alleviate symptoms. Also, indulge in high-fiber fruits and vegetables to enhance overall circulation and supply vitamins and minerals necessary for healthy and beautiful legs.

Legs-Up-the-Wall Pose - Viparita Karani


by Yoga Journal
The pose described here is a passive, supported variation of the Shoulderstand-like Viparita Karani. For your support you'll need one or two thickly folded blankets or a firm round bolster. You'll also need to rest your legs vertically (or nearly so) on a wall or other upright support.
Steps
Before performing the pose, determine two things about your support: its height and its distance from the wall. If you're stiffer, the support should be lower and placed farther from the wall; if you're more flexible, use a higher support that is closer to the wall. Your distance from the wall also depends on your height: if you're shorter move closer to the wall, if taller move farther from the wall. Experiment with the position of your support until you find the placement that works for you.
Start with your support about 5 to 6 inches away from the wall. Sit sideways on right end of the support, with your right side against the wall (left-handers can substitute "left" for "right" in these instructions). Exhale and, with one smooth movement, swing your legs up onto the wall and your shoulders and head lightly down onto the floor. The first few times you do this, you may ignominiously slide off the support and plop down with your buttocks on the floor. Don't get discouraged. Try lowering the support and/or moving it slightly further off the wall until you gain some facility with this movement, then move back closer to the wall.
Your sitting bones don't need to be right against the wall, but they should be "dripping" down into the space between the support and the wall. Check that the front of your torso gently arches from the pubis to the top of the shoulders. If the front of your torso seems flat, then you've probably slipped a bit off the support. Bend your knees, press your feet into the wall and lift your pelvis off the support a few inches, tuck the support a little higher up under your pelvis, then lower your pelvis onto the support again.
Lift and release the base of your skull away from the back of your neck and soften your throat. Don't push your chin against your sternum; instead let your sternum lift toward the chin. Take a small roll (made from a towel for example) under your neck if the cervical spine feels flat. Open your shoulder blades away from the spine and release your hands and arms out to your sides, palms up.
Keep your legs relatively firm, just enough to hold them vertically in place. Release the heads of the thigh bones and the weight of your belly deeply into your torso, toward the back of the pelvis. Soften your eyes and turn them down to look into your heart.


Stay in this pose anywhere from 5 to 15 minutes. Be sure not to twist off the support when coming out. Instead, slide off the support onto the floor before turning to the side. You can also bend your knees and push your feet against the wall to lift your pelvis off the support. Then slide the support to one side, lower your pelvis to the floor, and turn to the side. Stay on your side for a few breaths, and come up to sitting with an exhalation.

Supported Shoulderstand - Salamba Sarvangasana

by Yoga Journal

Fold two or more firm blankets into rectangles measuring about 1 foot by 2 feet, and stack them one on top of the other. You can place a sticky mat over the blankets to help the upper arms stay in place while in the pose. Then lie on the blankets with your shoulders supported (and parallel to one of the longer edges) and your head on the floor. Lay your arms on the floor alongside your torso, then bend your knees and set your feet against the floor with the heels close to the sitting bones. Exhale, press your arms against the floor, and push your feet away from the floor, drawing your thighs into the front torso.


Continue to lift by curling the pelvis and then the back torso away from the floor, so that your knees come toward your face. Stretch your arms out parallel to the edge of the blanket and turn them outward so the fingers press against the floor (and the thumbs point behind you). Bend your elbows and draw them toward each other. Lay the backs of your upper arms on the blanket and spread your palms against the back of your torso. Raise your pelvis over the shoulders, so that the torso is relatively perpendicular to the floor. Walk your hands up your back (toward the floor) without letting the elbows slide too much wider than shoulder width.


Inhale and lift your bent knees toward the ceiling, bringing your thighs in line with your torso and hanging the heels down by your buttocks. Press your tailbone toward your pubis and turn the upper thighs inward slightly. Finally inhale and straighten the knees, pressing the heels up toward the ceiling. When the backs of the legs are fully lengthened, lift through the balls of the big toes so the inner legs are slightly longer than the outer.


Soften the throat and tongue. Firm the shoulder blades against the back, and move the sternum toward the chin. Your forehead should be relatively parallel to the floor, your chin perpendicular. Press the backs of your upper arms and the tops of your shoulders actively into the blanket support, and try to lift the upper spine away from the floor. Gaze softly at your chest.


As a beginning practitioner stay in the pose for about 30 seconds. Gradually add 5 to 10 seconds to your stay every day or so until you can comfortably hold the pose for 3 minutes. Then continue for 3 minutes each day for a week or two, until you feel relatively comfortable in the pose. Again gradually and 5 to 10 seconds onto your stay every day or so until you can comfortably hold the pose for 5 minutes. To come down, exhale, bend your knees into your torso again, and roll your back torso slowly and carefully onto the floor, keeping the back of your head on the floor.

Supported Headstand - Salamba Sirsasana


by Yoga Journal
Use a folded blanket or sticky mat to pad your head and forearms. Kneel on the floor. Lace your fingers together and set the forearms on the floor, elbows at shoulder width. Roll the upper arms slightly outward, but press the inner wrists firmly into the floor. Set the crown of your head on the floor. If you are just beginning to practice this pose, press the bases of your palms together and snuggle the back of your head against the clasped hands. More experienced students can open their hands and place the back of the head into the open palms.
Inhale and lift your knees off the floor. Carefully walk your feet closer to your elbows, heels elevated. Actively lift through the top thighs, forming an inverted "V." Firm the shoulder blades against your back and lift them toward the tailbone so the front torso stays as long as possible. This should help prevent the weight of the shoulders collapsing onto your neck and head.
Exhale and lift your feet away from the floor. Take both feet up at the same time, even if it means bending your knees and hopping lightly off the floor. As the legs (or thighs, if your knees are bent) rise to perpendicular to the floor, firm the tailbone against the back of the pelvis. Turn the upper thighs in slightly, and actively press the heels toward the ceiling (straightening the knees if you bent them to come up). The center of the arches should align over the center of the pelvis, which in turn should align over the crown of the head.
Firm the outer arms inward, and soften the fingers. Continue to press the shoulder blades against the back, widen them, and draw them toward the tailbone. Keep the weight evenly balanced on the two forearms. It's also essential that your tailbone continues to lift upward toward the heels. Once the backs of the legs are fully lengthened through the heels, maintain that length and press up through the balls of the big toes so the inner legs are slightly longer than the outer.
As a beginning practitioner stay for 10 seconds. Gradually add 5 to 10 seconds onto your stay every day or so until you can comfortably hold the pose for 3 minutes. Then continue for 3 minutes each day for a week or two, until you feel relatively comfortable in the pose. Again gradually add 5 to 10 seconds onto your stay every day or so until you can comfortably hold the pose for 5 minutes. Come down with an exhalation, without losing the lift of the shoulder blades, with both feet touching the floor at the same time.

Meditation 101

By Claudia Cummins

To give meditation a try, sit comfortably, set a timer for 10 minutes, and explore one of the following strategies. And consider yourself forewarned: Meditation is a delightfully simple practice, but that doesn't mean it's easy!

Just sit. Commit to doing nothing more than sitting quietly and watching what happens. Don't pick up the phone, don't answer the doorbell, don't add another item to your to-do list. Just sit and observe the thoughts that arise and pass through your mind. You will likely be surprised by how difficult it is to sit quietly for 10 minutes. In the process, though, you may learn something important about the qualities of the restless mind and the ever-changing nature of life.

Listen to the sounds of life. Close your eyes and tune in to the sounds percolating both within and around you. Open your ears and adopt a receptive attitude. At first, you'll likely hear only the most obvious noises, but over time, you'll discover new layers of sounds that you had previously tuned out. Challenge yourself to observe what you hear without clinging to it or resisting it. Notice how the world feels more alive as your awareness of the present deepens.

Practice bare attention. Notice the raw sensations of the present moment—feelings of warmth and coolness, hardness and softness, pressure and ease. Which parts of your body are in contact with the earth? How does the shape of the body shift with each inhalation and exhalation? How does your experience change over time? Cultivating an awareness of the present moment will foster a more serene and attentive mind, one that is able to settle into the here and now.
Follow the breath. Attach your mind to the breath. While you're breathing in, note that you're breathing in, and while you're breathing out, focus on the exhalation. Don't manipulate the breath in any way; simply watch it with your mind's eye, just as you would follow a tennis ball bouncing from one side of the court to the other during a particularly engrossing match. When you find that your mind has strayed, as it inevitably will, gently refocus it on the breath and begin again.

Use a mantra. Choose a favorite word, phrase, prayer, or fragment of a poem, and repeat it slowly and softly. Let its rhythm and meaning lull you into a quiet, contemplative state of ease. When you notice that your mind has wandered off to other thoughts, simply redirect it back toward the words you've chosen as your touchstone and rededicate your awareness to them.
Practice kindness. As you sit quietly, focus your inner attention on someone you know who might benefit from an extra dose of kindness and care. In your mind's eye, send this person love, happiness, and well-being. Soften your skin, open the floodgates of your heart, and let gentle goodwill pour forth.

Friday, November 21, 2008

Adho Mukha Svanasana - Downward Facing Dog


by Cyndi Lee

Downward Dog is a home-base asana, one in which we can explore the challenge of being alert and attentive as well as the comfort of returning home. This is the essence of yoga: waking up and letting go at the same time. Think about staying present with your experience in every Down Dog and at the same time finding a sense of spaciousness within the pose's familiarity. After 5 breaths, begin the entire sequence to the other side.

Bharadvajasana

by Cyndi Lee

From Vajrasana, shift your hips to the right and sit down on your right hip. As you inhale, lift your arms up; as you exhale, twist to the right. Let your arms float down, turning the left palm up and slipping the fingers under your right thigh. Place your right fingertips on the floor behind your tailbone. Imagine that the spine is a barber's pole and twist around it. Feel this spiral of energy extending up above you and down below you. Stay in this twist for 5 breaths, then come back to Vajrasana.

Ustrasana - Camel Pose

by Cyndi Lee

Release your arms from Gomukhasana and place your hands on the floor on either side of your knees. Rock forward and, on an inhalation, lean onto your hands so you come slightly off the ground. During the split second you are airborne, uncross your legs and land lightly on the tops of your shins in Vajrasana (Thunderbolt Pose). Lift your hips directly over your knees and tuck your toes under. Feel your weight drop down through your toes and knees. Move your pelvis forward slightly as you press the thighs back. On an inhalation, lift the chest and look up, up, up. Begin to bend up and over a huge imaginary beach ball, so the spine extends evenly. Move the spine in toward the back of the heart to open the chest and maintain space in the lower back. Take hold of your ankles. (If you can't reach them, place your hands on blocks alongside your feet.) If you're able to keep your shoulder blades firm, your head should drop back easily. If that doesn't feel good, keep your head lifted and look forward. Stay here for 3 breaths, then press down into your feet as you come back up on an inhalation, bringing your head up last. Rest in Vajrasana for a moment or two. Repeat 1 or 2 more times and end in Vajrasana.

Gomukhasana - Cow Pose

by Cyndi Lee

From Down Dog, shift your weight forward and place your right knee on the floor between your hands. Bring your left knee directly behind it and sit down between your shins, stacking your knees and moving into Gomukhasana. Lift your left arm up, externally rotate it, bend your elbow, and place your palm down your back between your shoulder blades. Then internally rotate your right arm, bend it behind your back, and reach it toward your left hand. If your hands don't reach, make the connection by using a yoga strap or belt. Notice if your elbows are splaying outward or if the top one is falling forward. Try to move your upper arms and elbows toward the midline, even in this pretzel-like position. This pose is a great preparation for backbends, because it opens the sacral area, creates softness in the groins, and opens the triceps and shoulders. In this pose, go inward mentally and energetically for 5 to 8 breaths.

Urdhva Mukha Svanasana - Upward facing dog

by Cyndi Lee

From your belly, place your palms in line with your chest and come to the tops of your feet. On an inhalation, lift everything up off the floor except the feet and hands, coming into Upward-Facing Dog. Even though your legs are apart, look for a magnetizing energy between them, sending a charge up the spine. Allow the spine to sink into the back of the heart to open the chest. Move the inner edges of the shoulder blades down and toward each other, once again creating space, this time in the neck. Soften and draw the front of your throat in lightly to create even more space in the back of the neck. Stay here for 2 breaths, then push yourself back into Down Dog and hold for 3 breaths.

Anantasana - Side Reclining Leg Lift


by Cyndi Lee

From Vasisthasana, slowly let your hips get heavy and bring them down onto the floor. Lower all the way down and lie on your right side. Bend your right arm and use it to support your head; try to find a Mountain Pose–like alignment. Then externally rotate your left leg and bend your knee. Take hold of the big toe with the first two fingers of your top hand and, on an exhalation, extend the leg up toward the sky. Your top leg will likely go forward on a slight diagonal line. See what you can learn from the rocking and rolling quality of this pose. Can you draw in and expand out at the same time without tension? Look for the answer in your physical alignment and notice how that affects your breath and your mind. Work on this pose for 5 to 8 breaths, then release the top leg and roll over onto your tummy.

Vasisthasana - Side Plank Pose


By Cyndi Lee


From Downward Dog, bring your feet together. Draw your shins toward each other and in toward your midline; this action creates a subtle internal rotation and a sense of space between the thighs. As you shift onto the outside of your right foot and balance on your right hand, draw your tailbone down into this space. Shifting from Down Dog, in which the sitting bones are wide, to a pose in which there's a more integrated relationship between the pubis and the tailbone is another way to establish a midline connection, this time between the front and back bodies. Next, slowly unravel the left side of the body, just as you did in Ardha Chandrasana. If your hand is in line with your mouth, it's in the right place. Feel how pulling into your center gives you the confidence to expand out into space. Stay here for 3 breaths.


Virabhadrasana III - Warrior III


by Cyndi Lee
From Ardha Chandrasana, shift your pelvis so it faces the floor. Internally rotate your left leg as you pull your right outer hip crease back; at the same time, sweep both arms forward alongside your ears, coming into Warrior III. Imagine that your arms begin at the bottom of your back ribs; from there, reach out through your fingers. Tone your belly by gently drawing your abdominals in; lift the hip points up toward your bottom ribs to fill the back of your waist. With a strong awareness of your center, reach out through your head and tailbone equally. Hold for 3 to 5 breaths.

Ardha Chandrasana - Half Moon Pose

By Cyndi Lee

Start in Adho Mukha Svanasana (Downward-Facing Dog Pose), with your hands pressing firmly into the mat and your heels reaching toward the floor. Turn your left heel down and step your right foot between your hands. Place your right hand about 8 inches in front of your right foot (on the floor or on a block) and your left hand on your left hip. On an inhalation, lift the left leg up and straight back, coming into Ardha Chandrasana. As you exhale, spin your left ribs, armpit, fingers, and your face up toward the sky. Move the tailbone and pubic bone toward each other to create a powerful connection from which you can extend through the arms, legs, and crown of the head—you should feel as though you're radiating out like the rays of the moon on a dark night. Feel your energy reaching past your fingertips and try to ride the movement of this big balancing pose for 5 breaths before moving on.

Sunday, November 16, 2008

Finding a comfortable cross-legged position

By Esther Myers

Sitting cross-legged is an important part of yoga practice and is commonly used for breathing and meditation practices. It requires flexibility in the back thighs, back of the pelvis, and inner thighs, as well as external rotation of the hip joints. These are all very strong muscles that can take a long time to stretch. Whether you sit in a simple cross-legged posture like Sukhasana or a more difficult pose like Padmasana (Lotus Pose), developing the flexibility to sit easily is a gradual process.

And it’s important to note that everyone has a different anatomical structure in their hips, which may potentially inhibit this kind of movement. If this is the case for you, then trying to work up to Padmasana (Lotus Pose) is an inappropriate goal. I encourage you to try other poses that may be more comfortable, like Vajrasana (Thunderbolt Pose), sitting on your heels, Virasana (Hero Pose), sitting between your heels, or Gomukhasana (Cow Face Pose). You can also meditate sitting on a chair. The chair should be firm, your back straight, and your feet on the floor or supported on a book or cushion.

If you choose to sit cross-legged, it is important to have your knees level with or below your hips. If you are having difficulty maintaining an erect spine while sitting cross-legged, begin by sitting on the edge of a cushion, bolster, or rolled blanket. For additional support, place rolled blankets or bolsters under your knees. (You may find that with the knees supported, the inner groins relax and that when you take the supports away, your knees drop further easily.)

Tightness in the inner thighs and hips is often connected to tension in the deep muscles of the abdomen (like the psoas). You can begin to release your pelvis by practicing breathing deeply into your abdomen. Focus on the rise and fall of your belly as you inhale and exhale. In all of the poses that follow, imagine the exhalation releasing out of your pelvis and through your legs, helping the thighs to relax and let go.

Standing poses, especially Virabhadrasana II (Warrior II Pose), and Parsvakonasana (Side Angle Pose), will help open the hips. Leg stretches lying on your back, Supta Pandangustasana (Reclining Big Toe Pose), taking the lifted leg both up and to the side will also stretch your legs.

Raja Kapotasana (King Pigeon Pose) forward bend is also an excellent hip opener. Supta Baddha Konasana (Reclined Bound Angle Pose), lying on your back with your feet together and knees apart is a good resting pose that will allow your hips to gradually open. Put a folded blanket or a bolster under your feet, so that your back is resting on the floor. In both of these poses, allow yourself to relax into the stretch, letting gravity help you to sink into the floor as you exhale.

Sitting poses that will help are: Janu Sirsasana (Head-to-Knee Forward Bend), Baddha Konasana (Bound Angle Pose), and Upavistha Konasasana (Open Angle Pose). Learning to stay longer in these poses will help the flexibility in your hips; however, you need to be careful not to overstretch your lower back. Setu Bhanda Sarvangasana (Bridge Pose) and Bhujangasana (Cobra Pose) are good counter-poses.

Esther Myers' 10 years as a student of Vanda Scaravelli inspired her to find her own unique, organic approach to yoga. Esther has taught classes across Canada, Europe, and the United States, and has extensive experience training teachers. She is coauthor of a practice manual for beginners and author of Yoga & You. She has produced two videos, Vanda Scaravelli on Yoga and Gentle Yoga for Breast Cancer Survivors, both of which are available through Shop YJ.

Wednesday, November 12, 2008

Yoga to Cultivate Compassion,Gratitude, and Joy

By Timothy McCall, M.D

One reason yoga is a powerful means to build mental health is because its aim is higher than traditional psychology's. Psychology, like its counterpart modern medicine in the physical plane, tends to view mental health as the absence of negative states such as depression or anxiety. In contrast, yoga, as a holistic science, views health as representing a high level of physical, psychological, and spiritual well-being. (Luckily, there is a movement afoot, led by such pioneers as psychologist Dr. Martin Seligman, to bring more focus on what they are calling "positive psychology.")

Rather than simply help you feel less sad or anxious—which yoga can also do (see Yoga for Depression, Parts I and II and Yoga for Anxiety and Panic Attacks, the practice can put you in touch with sukha, a deeper sense of calm or ease. Yoga teaches that joy, or ananda, lies deep inside each of us, and its various tools are simply a means to get at what's already there, so you can experience it fully. Yoga also addresses such issues as meaning, life purpose, and your connection to others and the world around you, which can have profound effects on happiness and health.

But beyond personal well-being, yoga seems to facilitate the development of qualities such as compassion, forgiveness, equanimity, and a desire to help others. Spiritually evolved beings seem to have boundless compassion for the suffering of others and a remarkable ability to forgive those who trespass against them (think of the Dalai Lama or Nelson Mandela). Just looking into the eyes of some yogis, you can sense their inner gratitude and joy. The question is, how do you get there (or closer to there)? And for yoga teachers and therapists, how can you help your students reach this state?

While the asanas are a great place to start—and almost everyone would benefit from including at least some asanas in their practice—I believe that combining the physical postures with other yogic tools is an even more effective way to grow spiritually. Tools as diverse aspranayama, meditation, philosophical understanding, and selfless service (or karma yoga) help you grow in joy, compassion, and equanimity, working synergistically to deepen the effects.

The Breath
The mind, according to yogic teachings, is the cause of most suffering. Yogis began systematically studying the mind, and the tricks it plays, thousands of years before the field of psychology was even invented. Probably the most important tool the ancients uncovered for taming the runaway mind was the breath. Simply slowing your breathing and making it smoother and more regular can relax the nervous system and, when the nervous system is relaxed, the mind often follows. In sutra I.34, Patanjali suggests that by focusing on the exhalation in particular, such spiritual qualities as cheerfulness, equanimity, and compassion can be developed.

People who are stressed, as well as those who are unhappy, angry, or worried about "getting theirs," tend to live in a state of physiological arousal. Their sympathetic nervous systems ("fight or flight") may be activated most of the time. Slow, regular breathing tends to shift the balance to the more relaxing and restorative parasympathetic nervous system (PNS), which all by itself can help people tap into the joy that lies at your core. Prolonging the exhalation relative to the inhalation can be an even more powerful way to increase PNS dominance.

Suggest students with less experience gradually lengthen their exhalations, slowly working toward a 1:2 ratio, with the exhalation twice as long as the inhalation. For those who are ready for it, add a brief retention after the exhalation to deepen the effects. Be cautious, though: If you push pranayama farther or more quickly than you should, it can agitate the nervous system, potentially exacerbating precisely what you are trying to help.

Warn your students that although pranayama techniques may not look like much, they can do serious damage to the nervous system and to the psyche when they are improperly applied.

Particularly dangerous are fancy ratio breathing and prolonged breath retention—the very tools that may be most intriguing to enthusiastic new students. Any straining, air hunger, or gasping during the practice signals they are pushing things too far. Likewise, restlessness, agitation, or difficulty sleeping in the hours or days after practicing are warning signs of overaggressiveness.

When practiced with patience and care, however, yogic breathing can be a doorway to peace of mind and personal transformation.

Monday, November 10, 2008

Surround Sounds

By Alan Di Perna
Drop in on a yoga class anywhere in America, and chances are good that you'll hear a melody wafting from a nearby boom box or stereo. Be it Sanskrit mantras, soft synthesizer textures, or even contemporary indie hits, music is often an integral part of yoga instruction in the West.

But Krishnamacharya, the father of modern yoga and teacher of B.K.S. Iyengar, K. Pattabhi Jois, and T.K.V. Desikachar, did not hold trance dances for his students. "Even 15 years ago in the United States, you didn't hear music in yoga class," says Sharon Gannon, the cofounder of Jivamukti Yoga Center in Manhattan. Gannon and her partner, David Life, played a pioneering role in bringing music into the yoga studio. Musicians themselves (check out Neti-Neti by their group, Audio Letter), Gannon and Life helped foster the careers of Jai Uttal and Krishna Das, among others. They worked closely with musician Bill Laswell in creating his Asana series of albums and the Meta record label. Gannon says she and Life are merely applying bhakti yoga to asana practice, by introducing devotional chanting and live music in class.

"David and I studied yoga scriptures, and the Hatha Yoga Pradipika in particular emphasizes music. It says the whole purpose behind hatha yoga is to purify the nadis (energy centers) so that you can hear the inner, primal sound current—the sound of Om. Listening to certain kinds of music can help you develop this capacity for hearing. And so the playing of music became part of the method of yoga that David and I teach."

Aadil Palkhivala, a teacher who has practiced yoga since his childhood in India, thinks differently. For Purna Yoga—a method he synthesized from classically based traditions including Iyengar Yoga, Ayurveda, and the teachings of Sri Aurobindo and others—Palkhivala has chosen quiet.

"There is a very big place for music in the world, but there is no place for music in yoga class," he says.

"My teaching is designed to help the student find his or her own nature—the divinity within," Palkhivala continues. "And that cannot be done while music is playing. Music becomes an impediment—a distraction. Many people need that distraction because they're so caught up in their own minds. But I would ask, why are we so afraid of silence?"

Of course, silence is not what all yoga teachers are trying to avoid when they turn up the volume. "If you're teaching yoga in a health club, music is a must," says Beth Shaw, founder of YogaFit Training Systems Worldwide. "Music can help mask exterior sounds from weights, cardio machines, and people talking outside."

Shaw has created several YogaFit CDs, compiling tracks by everyone from tribal trance dance innovators Gabrielle Roth & The Mirrors to ambient electronic artists like The Essence and Solar Moon System. Most YogaFit CDs include tunes for warming up, working out, and cooling down so instructors don't have to change CDs during class. Shaw says with CDs teachers can stop checking the clock: "When the music starts to slow, you know it's time to cool down and do deep, relaxing stretches."

Decisions about playing music are highly individualized. While it seems pretty certain that music during practice isn't traditional, many contemporary teachers and students are trying to balance the classical wisdom of yoga with the realities of modern life. Fortunately, for those who do opt to play background tunes, there is an abundance of music recorded for yogis with Western ears.

Check out the newest Deva Premal album, Dakshina (White Swan); Bill Laswell's most recent entry in his Asana series, Ohm Shanti (Meta); Midnight Flower, by Drala (Dharma Moon); or YogaFit's Sunset in Santa Fe. And if you don't want to practice to them, these CDs still make great listening.